Check Balance/Make Payment
To view account balance information and make a payment
The new online payment system will allow you to see your account balance within CASHNet. You may go to Hass-Darr Hall, room 110 and make a payment in person at the Business Office or make a payment online.
If you still have questions after following the below instructions, call: 417-255-7960 or email: WPBusinessOffice@MissouriState.edu
To make a payment and view account balance information
- Log into MyGrizzlyDen.MissouriState.edu.
- Click on the CashNet button on the University Account - Billing card.
Note: If you do not see the University Account - Billing card which contains the CashNet button, click on the Discover More button at the bottom of the web page or under the menu and search for the card using keywords like CashNet, billing, or payment. - Under My Account, click on Make a Payment.
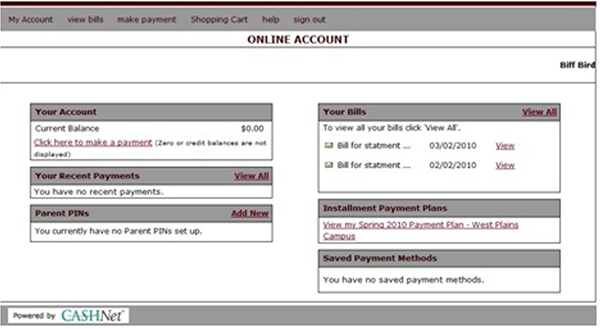
- This will show your account balance within CASHNet Transact (the online payment system).
- This will allow you to make a payment online using credit cards or electronic check. You still have the option to make a payment at the business office in Hass - Darr room 110.
- Clicking the Make a Payment link will not force students to pay, it will just show them a balance, and give them the option to pay.
For more information on payment and account balance information, please contact the business office located in Hass - Darr room 110, 417-255-7260 or WP.MissouriState.edu/BusinessOffice for documentation, payment deadlines, FAQ’s, etc. For financial aid information, please call 417-255-7243.
Parents/guardians/authorized payees:
The student must give access to any authorized payees to make online payments. Please contact your student to be setup with access to the payment site. Authorized payees will need a valid e-mail address to be setup.
To set up parents/guardians/authorized payees with access to make a payment and view the balance:
- Students will need to login to MyGrizzlyDen.MissouriState.edu.
- Click on the CashNet button on the University Account - Billing card.
Note: If you do not see the University Account - Billing card which contains the CashNet button, click on the Discover More button at the bottom of the web page or under the menu and search for the card using keywords like CashNet, billing, or payment. - In the Parent PINs header, click on Add New.
- Assign a Login Name.
- Enter a valid email address and an optional welcome note. Login information will be sent to the email address chosen.
- Leave the default to Yes, the person can login.
- Click OK.
- Once authorized payees are set up with login name and password, they will receive an email with the link to CASHNet and instructions on how to change their password. Authorized payees will always use this link: (https://commerce.cashnet.com/mostatepay) to make a payment or view balance information.